How this calculator works
A pitched roof is a right triangle. The horizontal run goes from the outside wall to the ridge in the centre, the vertical rise is how far the ridge sits above the wall plate, and the common rafter is the sloping line that joins them. Everything keys off the slope ratio, rise divided by run:
slope ratio  = rise ÷ run         (a 6:12 pitch = 6 ÷ 12 = 0.5)
angle        = atan(slope ratio)
slope factor = sqrt(1 + slope ratio²)   ← rafter per unit of run
rafter       = run × slope factor       = sqrt(run² + rise²)
overhang     = horizontal overhang × slope factor
You can enter the pitch as a x:12 ratio, as an angle in degrees, or as a plain rise over the run, and the calculator converts between all three. The slope factor doubles as the roof-area multiplier: multiply the flat footprint area by it to get the real sloping surface area for sheathing and shingles.
Worked example
This example follows the unit system you pick in the calculator above.
A 6 : 12 roof over a 26 ft span (so a 13 ft run), with a 1 ft eave overhang:
- Slope ratio: 6 ÷ 12 = 0.5 (rise per unit of run).
- Rise: 13 × 0.5 = 6.5 ft from wall plate to ridge.
- Angle: atan(0.5) = 26.6° (grade 50%).
- Slope factor: √(1 + 0.5²) = 1.118.
- Common rafter: 13 × 1.118 = 14.53 ft wall to ridge.
- Overhang tail: 1 × 1.118 = 1.12 ft, so the full rafter is 15.65 ft.
Roof pitch conversion table
The same handful of pitches come up again and again. This table maps the US x:12 ratio onto the angle, the percentage grade and the slope (rafter) factor:
The slope factor column is the quick way to size a roof: take the flat plan area of the roof, multiply by the factor for your pitch, and you have the sloping area to cover. For the full breakdown of every pitch in degrees, percent and slope factor, see the roof pitch chart.
Roof slope, roof angle and roof pitch
These three are the same idea in different words. Pitch is the rise-over-run ratio a builder reads off a framing square, usually written x:12. The roof angle is that slope measured in degrees from horizontal. Slope (or grade) is the same thing as a percentage. This tool shows all three at once, so a “roof slope calculator” and a “roof angle calculator” are just this calculator read in different columns - pick the pitch form you have and read off the rest.
Gable, shed and lean-to roofs
Pick the roof type in the calculator so the run is worked out correctly:
- Gable / pitched - two slopes meeting at a central ridge. Each rafter runs from the wall to the ridge, so the run is half the full span. Enter the span and the calculator halves it, or switch to “run only” if you measured wall-to-ridge directly.
- Shed / lean-to (single slope) - one slope from a low wall to a high wall, also called a mono-pitch or skillion roof. The rafter spans the full width, so enter the width wall-to-wall. See the dedicated shed roof pitch calculator and lean-to roof pitch calculator for the typical minimum slopes.
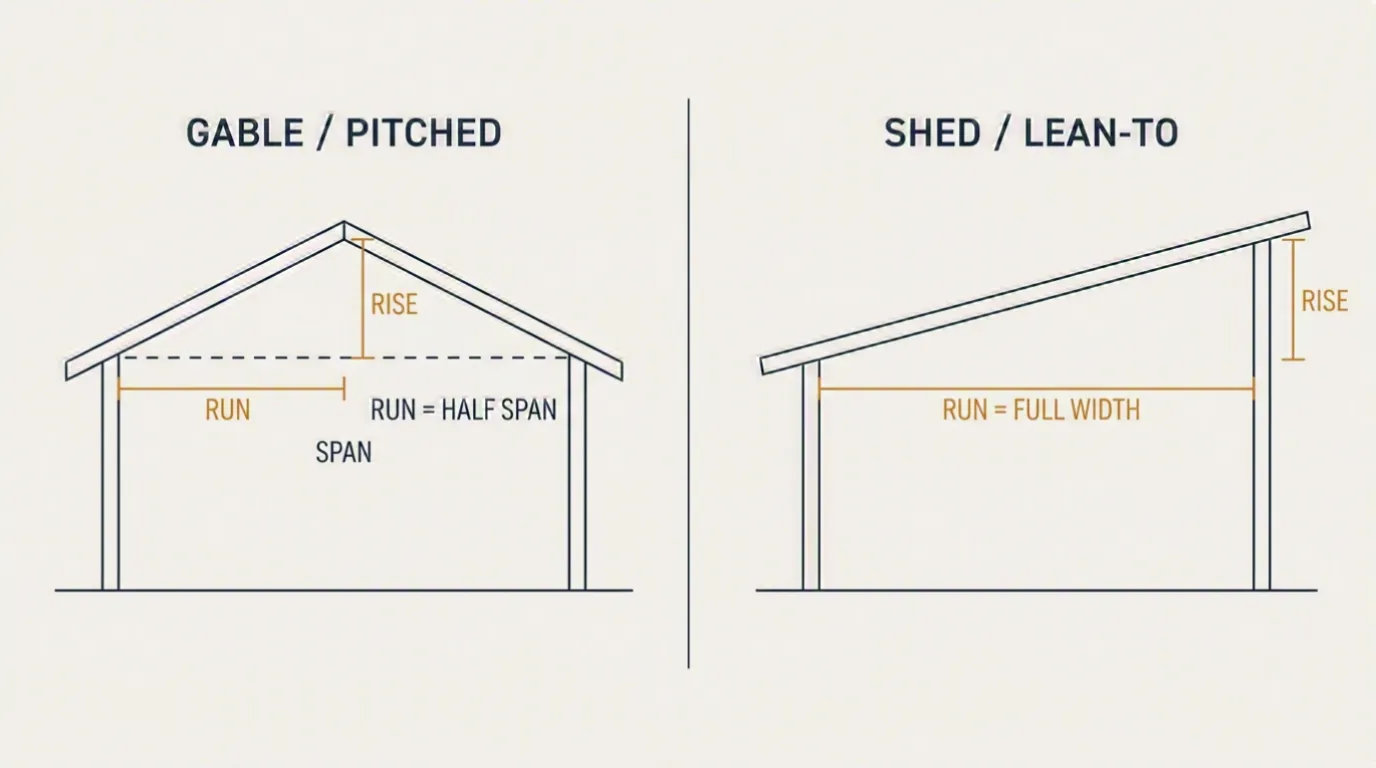
Run, span and the rafter
Two points trip people up:
- Run is not the building width. For a symmetric gable, each rafter spans from the wall to the ridge in the middle, so the run is half the full span. Use the Run / Full span toggle to enter whatever you measured.
- The rafter the calculator gives is the line length. It is the straight sloping distance from the wall plate to the ridge (plus the overhang tail if you add one). The real piece you cut is a little different once you allow for the ridge board, the notch at the wall and the end cuts - the next section explains each of those.
The parts of a rafter
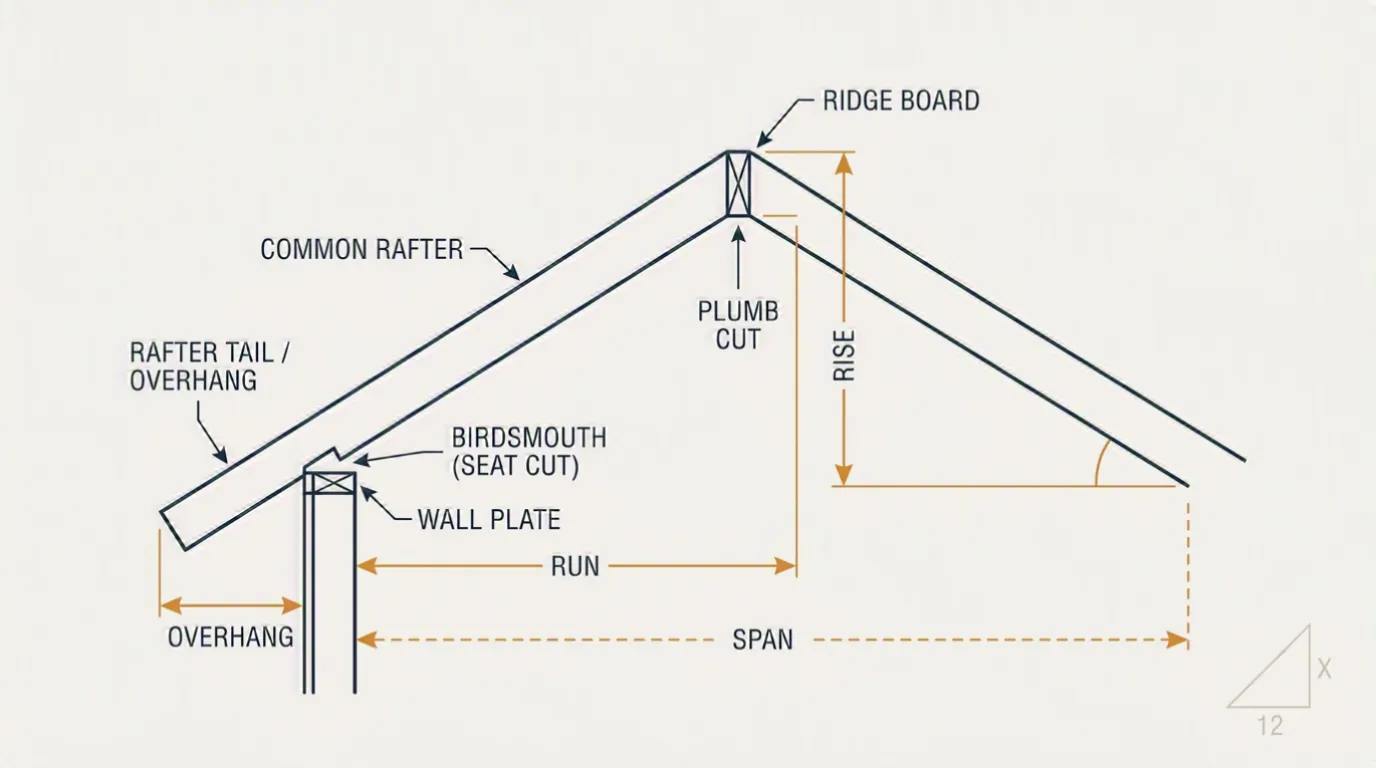
The calculator gives the common rafter line length - the straight sloping line from the wall to the ridge. Before you cut a real rafter, it helps to know the parts that line passes through:
- Wall plate - the horizontal timber running along the top of the wall. The rafters sit on it.
- Ridge (or ridge board) - the board along the very top of the roof where the two slopes meet. The run is measured to the centre of the ridge, but the board itself is solid, so each rafter has to stop half the ridge thickness short of that centre line. That is why you deduct half the ridge thickness from the run before cutting.
- Plumb cut - the vertical cut at the top of the rafter, where it sits flat against the ridge.
- Birdsmouth (seat cut) - the small L-shaped notch near the bottom of the rafter that lets it sit flat on the wall plate. It has a level “seat” that rests on the plate and a vertical “heel”.
- Rafter tail (overhang) - the part that carries on past the wall to form the eave. Enter the overhang above and the calculator adds its sloping length to the rafter.
So the timber you actually cut is the calculator’s line length, less half the ridge thickness at the top, plus the overhang tail at the bottom, with a plumb cut at the ridge end and a birdsmouth where it crosses the wall. Cut one rafter, offer it up to check it fits, then use it as a template for the rest.
Tips for setting out rafters
- Measure the run carefully - a small error in the run is multiplied by the slope factor in the rafter, and again across every rafter on the roof.
- If you are matching an existing roof, measure the pitch first, set it by angle off a digital level, then read the x:12 ratio the calculator gives so you can talk to your timber supplier in their terms.
- Order rafters a little long and cut to fit on site; the plumb cut at the ridge and the seat cut at the wall both eat into the board.
- For the roof covering, work in sloping area (footprint × slope factor), not the flat footprint, or you will under-order sheathing, underlay and shingles.
- Always check span tables and your local building requirements for the rafter size and spacing - this calculator gives lengths and angles, not structural sizing.